Unlike Photoshop’s layer masks, which are fairly straightforward to use, the opacity masks and clipping masks in Illustrator seem more confusing. A closer look however, reveals a system that is actually quite simple and very powerful. Photoshop masks tend to apply to a specific layer, so a mask can often be added with a simple button click while the desired layer is active. In Illustrator on the other hand, masks don’t normally affect whole layers, but target individual objects or object groups instead. There are two types of mask available within Illustrator; the opacity mask and the clipping mask. But how do they work?
opacity masks
The great thing about Illustrator’s opacity mask is that literally any object can be used to create one; an outline, a gradient fill or even a placed bitmap photograph.
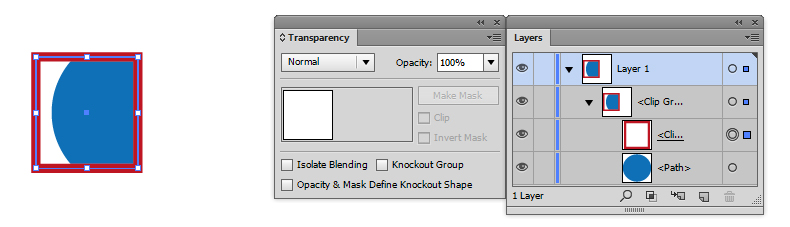
To create an opacity mask, select two objects (in our example, we use a white stroked rectangle filled with a gradient as a mask, and a solid blue circle as the object) then view the transparency panel (shift+ctrl/cmd+F10). In the panel, a single thumbnail view of the two objects will be visible. Now press the ‘Make Mask’ button. The upper object will now be acting as an opacity mask on the lower one.

Notice that the single thumbnail in the transparency panel has now become two; the object is on the left, while the opacity mask is to the right, joined by a link icon. Now we arrive at the area which can cause confusion to newcommers: editing the mask and object. On the artboard, click on your masked object, and then view it in the layers panel (F7). Where we may expect to see its mask and object displayed seperately, the layers panel will display them combined as a single object, with no apparent way to edit either part.

To edit the object inside the mask, click the left thumbnail in the transparency panel. Notice the layers panel changes accordingly, and the object on the artboard becomes highlighted and editable. Now click the other thumbnail in the transparency panel, and the layers panel will update to show the mask, which will be highlighted and editable on the artboard.

It’s worth noting the checkboxes in the transparency panel, which allow you to invert the mask, and control how any blending effects interact with other objects beneath.

Like Photoshop, grey value in the top object is used to calculate opacity value in the mask, so a Gradient opacity mask produces a gradual transition between visible and hidden. So far, so Photoshop… However, Illustrator’s opacity mask has a real advantage over Photoshop’s layer masks: vectors. Although vector masks are available in Photoshop, the editing tools available are limited and rather clumsy to use. In Illustrator though, most of the familiar vector manipulation tools are available. All the vector shapes & gradients in your mask remain editable too, regardless of their complexity, and can be enlarged with no loss in visual quality.
clipping mask
Unlike an opacity mask, a clipping mask can only be made with a vector outline, but it is much easier to use. To create a clipping mask, select two Illustrator objects, then go to Object > Clipping Mask > Make (or press alt+7). The upper object will now be used as a clipping mask for the lower. Like Photoshop’s vector mask, Illustrator’s clipping mask cannot produce gradual changes in opacity; it simply uses a vector outline to mask with a clean, sharp edge.

Although functionally the clipping mask is far more basic than the opacity mask, don’t let the clumsiness of Photoshop’s vector masks discourage you from using them. In Illustrator, any closed path can be used as a clipping mask; shapes, outlined strokes and even complex images that have been ‘traced’, so they are well worth exploring. The mask outline can even be selected via the layers panel and strokes applied to it.
So there you have it; a simple overview of opacity and clipping masks within Adobe Illustrator – not so complex after all, and very powerful. Have fun experimenting, and remember you can keep up to date with TPW’s news and get in touch by visiting us at Facebook or Twitter.